

- 1 Carrion Golem
- 2 Corpse Rat Swarms (see Open Grave)
Friday, November 27, 2009
D8 (Store Room)
The carrion golem has run out of things to break in this room, but sees the PCs as a new opportunity. Drawn out by the disruption the PCs' presence causes, swarms of undead rats join the fight as well. I suggest the following encounter for a party of five adventurers:
D7 (Alchemy Lab)
This encounter features a particularly special derro, "improved" by Rolth to include a terrifying surprise should it ever perish in battle. The Wyrmwarped Atrocity attacks with insane fervor, and, when reduced to 0 hit points, screams before exploding in a gout of acid. I suggest the following encounter for a party of five adventurers:
- 1 Kobold Slyblade
- 3 Kobold Hurlers (see Dungeon #155)
- 1 Wyrmwarped Atrocity (see Draconomicon)
D6 (Skull Corridor)
The lesser necrophidius monster featured here needed to be replaced. The bonewretch skeleton from Open Grave works just as well. Not only can they just as easily represent the skeleton of a small monster (like a derro, perhaps) as they can a child, but their Rattling Shift power is a perfect analog for the necrophidius' ability to dissemble its bones to slither across the ground. I suggest the following encounter for a party of five adventurers:
Position the acid skull trap sprayers far enough apart that the entire room is covered by their
burst areas.
Stat block:

- 3 Bonewretch Skeletons
- 1 Acid Spraying Skulls
Position the acid skull trap sprayers far enough apart that the entire room is covered by their
burst areas.
Stat block:

D5 (Exsanguination Chamber)
In the original adventure most of the stirges gorge themselves on the corpse prepared for them instead of harrying the PCs. In this converted encounter, have the derro shoo them off the corpse and towards the party. Five stirges are better than two. I suggest the following encounter for a party of five adventurers:
- 2 Kobold Vermin Handlers (see Dragon Magazine Annual 2009)
- 5 Stirges
D4 (Corpse Dump)
The otyugh present here is the real deal - stronger and wilder than those found dwelling in Korvosa's sewers. It has a number of lurking filth-feeding allies, too: a jelly and a couple of oozes. I suggest the following encounter for a party of five adventurers:
If the otyugh finds itself dealing with too many enemies at once, it positions itself near the filth pit and drags one of the PCs into it with its tentacles. Don't forget to have the jelly split when it reaches bloodied.
The necklace at the bottom of the pit is worth 140 gold pieces (treasure parcel 9 from level 4). Also present here is treasure parcel 3 from level 3. Consider dividing that parcel up into potions, elixirs, or alchemical items.
- 1 Otyugh
- 1 Ochre Jelly
- 2 Gray Oozes
If the otyugh finds itself dealing with too many enemies at once, it positions itself near the filth pit and drags one of the PCs into it with its tentacles. Don't forget to have the jelly split when it reaches bloodied.
The necklace at the bottom of the pit is worth 140 gold pieces (treasure parcel 9 from level 4). Also present here is treasure parcel 3 from level 3. Consider dividing that parcel up into potions, elixirs, or alchemical items.
D3 (Derro Cave)
The derro in this room are startled by the PCs' presence, but take a break from their own twisted version of rat-torture D&D to deal with the party. I suggest the following encounter for a party of five adventurers:
Describe the derro's actions as maddeningly erratic (including their Shifty power). Flavor their combat style well and unless the party has had run-ins with kobolds in the past they'll never realize they're fighting a completely different base monster.
- 1 Kobold Rat Master (see Dragon Magazine Annual 2009)
- 1 Kobold Vermin Handler (see Dragon Magazine Annual 2009)
- 2 Kobold Pikers (see Dragon Magazine Annual 2009)
- 1 Kobold Slyblade
Describe the derro's actions as maddeningly erratic (including their Shifty power). Flavor their combat style well and unless the party has had run-ins with kobolds in the past they'll never realize they're fighting a completely different base monster.
D1 (Ossuary)
All of the monsters present here begin the encounter hidden. Characters with a passive Perception of 14 or greater are able to avoid being surprised.
The owlbear skeleton has been replaced with an offalian, but its general purpose and place in the warrens remains the same. I suggest the following encounter for a party of five adventurers:
The owlbear skeleton has been replaced with an offalian, but its general purpose and place in the warrens remains the same. I suggest the following encounter for a party of five adventurers:
- 3 Skeletons
- 3 Skeleton Archers (see Dungeon #166)
- 1 Offalian (see Open Grave)
The Dead Warrens
Locating the wheelbarrow trail is a DC 15 Perception check, as is finding the secret trap door within the mausoleum. Identifying the derro footprints is a DC 25 Nature check.
Derro do not exist in 4th Edition at present. This isn't a big deal at all, since they can be easily and effectively represented by reskinning kobold stat blocks. If you'd really like to customize them to contain more derro flavor, consider adding some powers from the Those Who Hear monster theme from the Dungeon Master's Guide 2 (page 120).
Be sure to increase the physical size of a number of the rooms in the Warrens. A few of the areas (especially D4, D6 and D8) are far too cramped to allow for the sort of dynamic combat the game is suited for. Discovering any of the crawlspace secret doors in the Warrens requires a DC 18 Perception check.
A Missing Body
If the PCs successfully return Trinia to the guard, they are rewarded with 380 gold pieces (treasure parcel 5 from level 3) and treasure parcel 4 from level 3.
At this point you should have run all of the encounters from A City in Turmoil. If you have not done so, make that your priority. The city has calmed, and vengeful mobs and raving madmen will be that much more out-of-place after Eel's End.
Provide the party with a major quest to return Gaekhen's remains, and the promise of 700 gold pieces (treasure parcels 6 and 7 from level 4) for doing so.
Otyugh Uprising
A number of dire rats join the otyughs in this fight, drawn up from the sewers below. The otyughs here are less powerful than their normally wilder kin, having grown complacent from the constant supply of food the sewers bring them. Because of this, and to make the PCs' lives easier, they have been reduced to level 4. I suggest the following encounter for a party of five adventurers:
Stat block:

- 2 Korvosan Sewer Otyughs
- 4 Dire Rats
Stat block:

Meet the Mob
The PCs can disperse the mob with a skill challenge, if they'd like. Of course, they can always simply leave the noble to his fate, or intervene more forcefully right from the start, depending on how they feel about the situation.
Should a fight break out, I suggest the following encounter for a party of five adventurers:
The Human Noble stat block here actually represents the leader of the mob, not Amin. Amin is treated as in the background during this encounter.
Amin rewards the party with 75 gold pieces (treasure parcel 10 from level 3) for his rescue before departing.
Skill Challenge: Meet the Mob
Setup: This skill challenge is straightforward. If the PCs choose the proper words, a fight can be avoided. If they manage to offend or upset the mob, violence is the result.
Should a fight break out, I suggest the following encounter for a party of five adventurers:
- 1 Angry Mob (see Dragon Magazine Annual 2009)
- 1 Human Noble
- 2 Human Bandits
- 6 Human Rabble
The Human Noble stat block here actually represents the leader of the mob, not Amin. Amin is treated as in the background during this encounter.
Amin rewards the party with 75 gold pieces (treasure parcel 10 from level 3) for his rescue before departing.
Skill Challenge: Meet the Mob
Setup: This skill challenge is straightforward. If the PCs choose the proper words, a fight can be avoided. If they manage to offend or upset the mob, violence is the result.

Mad Prophet
This encounter is pretty straightforward. Unless the PCs actively flee from the madman, he makes a +5 vs. Fortitude attack against a random PC. If successful, the target is exposed to filth fever (see Monster Manual page 219). Any other PC who tries to physically pry the old man off or push him away has a similar chance of being exposed.
Imps and Dragons
Use this encounter to liven up the city a bit - the constant feud between imps and pseudodragons has no connection to the riots, and thus helps Korvosa feel less one-dimensional by making it clear that there's more to the city than a monarchy in turmoil and a populace up in arms.
I suggest the following encounter for a party of five adventurers:
The imps attack first, ambushing the PCs from invisibility. It isn't until round four that the pseudodragons arrive and roll initiative. Their sole concern is attacking the imps, but if the party catches one of them in an attack (deliberately or inadvertently), they make targets out of both the party and the imps.
I suggest the following encounter for a party of five adventurers:
- 5 Imps
- 5 Pseudodragons
The imps attack first, ambushing the PCs from invisibility. It isn't until round four that the pseudodragons arrive and roll initiative. Their sole concern is attacking the imps, but if the party catches one of them in an attack (deliberately or inadvertently), they make targets out of both the party and the imps.
Drunken Guard
A DC 14 Streetwise check is enough to recognize Grau as the former Watch Sergeant. No skill checks are necessary to rescue Grau from his life of constant inebriation. If the PCs decide to sober him up, or escort him back to the guard, Grau isn't in much of a position to do anything about it. Deciding to ignore him is the only real way they can "fail" this encounter.
The Queen's Scapegoat
This is, essentially, one very large skill challenge. Give the party a minor quest to bring Trinia in safely. While finding Trinia's apartment is no heroic task, the Shingle chase certainly is. The original adventure even lays it out in a manner similar to how skill challenges are structured now.
Skill Challenge: The Shingle Chase
Setup: I've designed this skill challenge to mirror the original encounter design fairly closely. Below is a modified list of possible obstacles, expanded from the original adventure to include a handful of new skills in order to provide more opportunities for the whole party to participate:
Cluttered Rooftop - Acrobatics DC 10
Crumbling Rooftop - Acrobatics DC 20
Gap in Wall - Acrobatics DC 15
Hidden Shortcut - Perception DC 15
Narrow Hole in Wall - Acrobatics DC 20
Narrow Rooftop Leap - Athletics DC 15
Narrow Walkway - Acrobatics DC 15
Tightrope Shortcut - Acrobatics DC 20
Very Hidden Shortcut - Perception DC 20
Very Steep Roof - Athletics DC 10
Wall - Athletics DC 20
Wide Rooftop Leap - Athletics DC 20
Inclined Roof - Endurance DC 15
Split Path - Streetwise DC 15
Dead End - Streetwise DC 20
Rooftop Thugs - Diplomacy or Intimidate DC 10
Sympathetic Tenants - Diplomacy or Bluff DC 15
Choker Nest - Stealth DC 15
Scheming Thieves - Bluff or Intimidate DC 20
Concealed Passage - Streetwise or Perception DC 15
Create 15 cards, with two of the above obstacles on each. Place Trinia on card 4, and begin the event.

Delivering the Letters
Cressida rewards the party with an additional 450 gold pieces (treasure parcels 7 and 8 from level 3) for providing her with Ambassador Amprei's letters, plus treasure parcel 3 from level 2. If the party removed Devargo from the picture as well, the medals she grants the PCs are identical to those provided in the original adventure - a +2 bonus to Diplomacy checks involving citizens of Korvosa if worn openly.
Tuesday, November 24, 2009
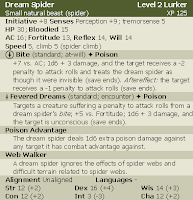
C16 & C17 (Bilge and Sodden Hold)
Once again, the party has the opportunity to tangle with a pair of jigsaw sharks. Though the monsters involved are identical to the shark encounter at the old fishery, this fight is made significantly more difficult because the PCs begin the fight in the water with the sharks. I suggest the following encounter for a party of five adventurers:
Total: 500 xp (Level 1 Encounter)
Total: 500 xp (Level 1 Encounter)
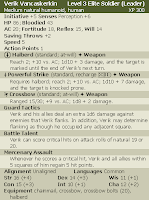
C15 (The Spider's Web)
This room contains a number of dream spider webs, which you should note clearly on the map you use during the combat. Characters who enter one of these squares of web are treated as though they were exposed to an attack from a dose of Dream Spider Venom.
The ogre spider here is represented by a deathjump spider, but your characters should know it by the name used in the adventure. I suggest the following encounter for a party of five adventurers:
Stat block:

The ogre spider here is represented by a deathjump spider, but your characters should know it by the name used in the adventure. I suggest the following encounter for a party of five adventurers:
- 1 Ettercap Fang Guard
- 1 Deathjump Spider
- 3 Dream Spiders
Stat block:

C8 - C14 (Eel's End Lower Deck)
Aside from the spider's lair in area C15 (detailed in its own section), the lower deck of the Eel's End is free of combat encounters.
Area C8 contains six vials of shiver worth 15 gold pieces each, and a single dose of Dream Spider Venom. All of this together is treasure parcel 9 from level 2. Though its combined value is more than 90 gold pieces, many parties will elect to destroy the shiver rather than selling it. Selling the shiver will net the party a bit of money, but it immediately drops the concordance value of Zellara's Harrow Deck by 2 points.
The door to area C9 can be opened with the key, a DC 20 Thievery check, or a DC 22 Strength check to break the door open.
The rope in area C10 (leading down to the bilge) can be climbed with a DC 10 Athletics check.
Areas C11, C12 and C13 require no conversion information.
Devargo's Den (area C14) contains a chest full of treasure which can be opened with the key or a DC 28 Thievery check. It contains treasure parcels 2 and 4 from level 2, an amulet worth 150 gold pieces, a necklace worth 200 gold pieces, a horn worth 20 gold pieces, and sacks of gold worth a total of 80 gold pieces (together, treasure parcels 6 and 9 from level 3).
Stat block:

Knivesies
The game of knivesies can be easily represented under the 4th Edition rules set. It requires a bit of preparation, and a handful of special rules (including a terrain power).
To set the event up, place both participants atop a 1-square-by-2-square table. They begin the encounter grabbed and restrained by each other (because their arms are bound together). This grab does not need to be sustained, and it cannot be ended voluntarily. Checks made to escape the grab take a -5 penalty. The leather strap binding the two participants together can be attacked (AC 16; Fortitude 15; other defenses 14; 20 hit points).
A dagger is stuck in the table before the start of the match. When the game begins, each participant rolls initiative (including bystanders!). The two participants have a handful of actions they can make use of: they can grab the dagger from the table (a minor action), attempt to escape from the straps (ending the grabbed and restrained conditions for both participants; see Escape, PHB 288), attack the leather strap or their opponent, or scoop up gold from the table (using a terrain power detailed below). They may also come up with other ideas, which you will have to adjudicate on the fly.
Bystanders can also participate, whether by throwing gold atop the table (a minor action to throw up to 1d10 gold coins onto the table) or indirectly assisting their champion. As the game progresses, you should keep track of how much gold is on the table, and how much each participant possesses.
The game is over when someone falls to 0 or fewer hit points, falls off the table (which allows a saving throw to avoid falling and to instead fall prone), or after no gold remains on the table (the rule that the game ends if any gold falls off the table is a silly one that encourages little more than the first person to snatch any gold to kick a single gold piece off to end the match and ensure victory).
Stat block:

Monday, November 23, 2009
C7 (Throne of Spiders)
Barvasi is found here, with a handful of his thugs. Negotiations with the King of Spiders (should the more peaceful route be attempted) take the form of a skill challenge.
Should fighting erupt in here, I suggest the following encounter for a party of five adventurers:
Modify the flavor of the abilities in the Onster Glarrak stat block to reflect spiders instead of snakes.
Devargo begins by triggering the trap door in the floor if anyone is atop it. Unless a creature falls into the pit, a round later the monsters in area C15 roll initiative and attack, climbing up out of the trap door and complicating this fight for the PCs a great deal.
Barvasi carries treasure parcel 1 from level 2.
With regards to the pseudodragon trapped in the cage, normally pseudodragons are not particularly intelligent in 4th Edition, nor nor are they able to communicate telepathically. Majenko, however, ought to be. If it is an issue, this can be easily justified by having him explain that he was the subject of some arcane experimentation at the Acadamae. Unlocking his cage is a DC 16 Thievery check. He will serve his rescuer as a companion character. As a DM, you should try to avoid having the party use him at every opportunity. If your group is lacking a player for the session, allowing one of the players to use Majenko can help level the playing field. His stats are provided below, at level 2. Follow the companion character guidelines presented in the Dungeon Master's Guide 2 for increasing his level (page 33).

Skill Challenge: An Audience with Devargo
Setup: The PCs have three methods at their disposal to draw the ambassador's love letters out of Devargo. They can bribe him, which automatically brings them closer to their goal, but deprives them of what might otherwise be their reward. They can persuade him to hand them over after winning his favor through skill checks. Finally, they can participate in games of knivesies and hope to beat the King of Spiders.

Should fighting erupt in here, I suggest the following encounter for a party of five adventurers:
- 2 Human Bandits
- 2 Halfling Thieves
- False Floor Pit (minor action to trigger while adjacent to throne, see Dungeon Master's Guide)
- Devargo Barvasi (use Onster Glarrak, see Dragon #372)
Modify the flavor of the abilities in the Onster Glarrak stat block to reflect spiders instead of snakes.
Devargo begins by triggering the trap door in the floor if anyone is atop it. Unless a creature falls into the pit, a round later the monsters in area C15 roll initiative and attack, climbing up out of the trap door and complicating this fight for the PCs a great deal.
Barvasi carries treasure parcel 1 from level 2.
With regards to the pseudodragon trapped in the cage, normally pseudodragons are not particularly intelligent in 4th Edition, nor nor are they able to communicate telepathically. Majenko, however, ought to be. If it is an issue, this can be easily justified by having him explain that he was the subject of some arcane experimentation at the Acadamae. Unlocking his cage is a DC 16 Thievery check. He will serve his rescuer as a companion character. As a DM, you should try to avoid having the party use him at every opportunity. If your group is lacking a player for the session, allowing one of the players to use Majenko can help level the playing field. His stats are provided below, at level 2. Follow the companion character guidelines presented in the Dungeon Master's Guide 2 for increasing his level (page 33).

Skill Challenge: An Audience with Devargo
Setup: The PCs have three methods at their disposal to draw the ambassador's love letters out of Devargo. They can bribe him, which automatically brings them closer to their goal, but deprives them of what might otherwise be their reward. They can persuade him to hand them over after winning his favor through skill checks. Finally, they can participate in games of knivesies and hope to beat the King of Spiders.

C1 - C6 (Eel's End Pier)
Fighting won't necessarily break out here and involve the Eel's End guards, but in case it does, I suggest the following encounter for a party of five adventurers:
- 12 Human Rabble
- 8 Halfling Stouts
The Ambassador's Secret
Award the party with 200 gold pieces should they bring Verik in alive, or 100 gold pieces if he arrives dead (treasure parcel 5 from level 1). Either way, Cressida also allows them to take a single level 3 magic item from the Citadel's resources for their continued service (treasure parcel 3 from level 1).
When the PCs accept the field marshal's request to visit Eel's End, give them a major quest to fish up some dirt on Ambassador Amprei. They are granted 500 gold pieces for the purpose of bribing the King of Spiders (regardless of how much they end up keeping, this is treasure parcels 5 and 10 from level 2).
When the PCs accept the field marshal's request to visit Eel's End, give them a major quest to fish up some dirt on Ambassador Amprei. They are granted 500 gold pieces for the purpose of bribing the King of Spiders (regardless of how much they end up keeping, this is treasure parcels 5 and 10 from level 2).
Vimanda's Raktavarna
The silver dagger on Verik's desk cannot be identified as a magic item, since it technically isn't one. Should the PCs attempt an Arcana check to detect magic (DC 29, see PHB page 181), they discover that the blade is magical despite having no properties of its own as a weapon. A second Arcana check can then be made (again, DC 29) to identify the dagger as the product of a ritual to create a raktavarna. Success on this check also means the character is somewhat familiar with raktavarnas and their connections to rakshasas. Should the creature wise up to the party's knowledge of its true nature, it shifts back to snake form to attack, falling dead mid-lunge as its connection to its master is cut off.
Tuesday, November 10, 2009
Tangent: Treasure and Leveling in Edge of Anarchy
This is where all information on experience point totals, level marks and treasure parcels for Edge of Anarchy will go. This post will be updated as the adventure is converted.
Treasure Parcels for Level 1:
Treasure Parcels for Level 2:
Treasure Parcels for Level 3:
Treasure Parcels for Level 4:
Treasure Parcels for Level 1:
- Parcel 1 is found with Verik Vancaskerkin.
- Parcel 2 is found in Gaedren Lamm's footlocker.
- Parcel 3 is provided by Field Marshal Cressida Croft.
- Parcel 4 is found in Gaedren Lamm's footlocker.
- Parcel 5 is the reward for bringing Verik to justice.
- Parcel 6 is found in Gaedren Lamm's footlocker.
- Parcel 7 is found in the livestock holding pens.
- Parcel 8 is found in Gaedren Lamm's footlocker.
- Parcel 9 is found in Gaedren Lamm's footlocker.
- Parcel 10 is found in Gaedren Lamm's footlocker.
Treasure Parcels for Level 2:
- Parcel 1 is carried by Devargo Barvasi.
- Parcel 2 is found in the Eel's End lower deck.
- Parcel 3 is awarded to the PCs for retrieving the ambassador's letters.
- Parcel 4 is found in the Eel's End lower deck.
- Parcel 5 is bribe or reward money for dealing with Barvasi.
- Parcel 6 is awarded to the PCs by Queen Ileosa.
- Parcel 7 is awarded to the PCs by Queen Ileosa.
- Parcel 8 is awarded to the PCs by Queen Ileosa.
- Parcel 9 is found in the shiver lab on the Eel's End.
- Parcel 10 is bribe or reward money for dealing with Barvasi.
Treasure Parcels for Level 3:
- Parcel 3 is found in the otyugh's filth pit.
- Parcel 4 is awarded to the PCs for bringing Trinia in.
- Parcel 5 is awarded to the PCs for bringing Trinia in.
- Parcel 6 is found in the Eel's End lower deck.
- Parcel 7 is awarded to the PCs for retrieving the ambassador's letters.
- Parcel 8 is awarded to the PCs for retrieving the ambassador's letters.
- Parcel 9 is found in the Eel's End lower deck.
- Parcel 10 is a gift from Amin Jalento for saving his life.
Treasure Parcels for Level 4:
- Parcel 6 is awarded to the PCs for returning Gaekhen's remains.
- Parcel 7 is awarded to the PCs for returning Gaekhen's remains.
- Parcel 9 is found in the otyugh's filth pit.
B7 & B8 (Upper Floor)
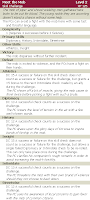
A couple of guards are up here when the PCs arrive, relaxing and playing cards. Verik is in the offices. If the upstairs is warned of the intruders, they take up ready positions and steel themselves for their arrival. Otherwise, they are startled by the party's appearance, and Verik appears on the second round to help deal with the problem. I suggest the following encounter for a party of five adventurers:
Verik wears, wields or otherwise carries treasure parcel 1 from level 1.
Stat block:
- 2 Emerald Claw Scouts
- 1 Emerald Claw Knight
- Verik Vancaskerkin
Verik wears, wields or otherwise carries treasure parcel 1 from level 1.
Stat block:

B5 (Holding Pens)
There is little the boars can do to the party if they are ignored, though should the PCs discover the treasure hidden in the southern pen they may decide to investigate the northern one as well. If they do so, the boars attack. I suggest the following encounter for a party of five adventurers:
The stash hidden in the southern cage contains 120 gold pieces worth of various coin and jewelry (treasure parcel 7 from level 1).
- 5 Boars (use 2 Guard Drakes and 3 Gray Wolves)
The stash hidden in the southern cage contains 120 gold pieces worth of various coin and jewelry (treasure parcel 7 from level 1).
Monday, November 9, 2009
Tangent: Edge of Anarchy Bestiary
Edge of Anarchy, as with all Pathfinder adventures, contains a number of new monsters to challenge a party of adventurers. Regardless of whether or not the monster appears in the actual adventure, I will be updating all Bestiary entries to 4th Edition.
Edge of Anarchy contains the Carrion Golem, Devilfish, Dream Spider, Soulbound Doll, Raktavarna, and Reefclaw. As monsters are used in the updated adventure they will be posted here, with the remaining entries published when the adventure concludes.
Carrion Golem:

Devilfish:

Dream Spider:
Soulbound Doll:

Raktavarna:

Reefclaw:

Edge of Anarchy contains the Carrion Golem, Devilfish, Dream Spider, Soulbound Doll, Raktavarna, and Reefclaw. As monsters are used in the updated adventure they will be posted here, with the remaining entries published when the adventure concludes.
Carrion Golem:

Devilfish:

Dream Spider:

Soulbound Doll:

Raktavarna:

Reefclaw:

B4 (Reefclaw Pit)
Should the PCs decide to investigate the pit beneath the grating in B4, make use of the following encounter. As per the original adventure, the reefclaws will tolerate the presence of someone in their pit as long as the character doesn't go browsing through the refuse at the bottom. Enlarge the size of the pit by a square or so in each direction. I suggest the following encounter for a party of five adventurers:
Total: 500 xp (Level 1 Encounter)
Total: 500 xp (Level 1 Encounter)
B4 (Killing Floor)
The metal track that runs across this room's ceiling provides an interesting bit of interactive terrain. Terrain powers for sliding across the room on meat hooks and shoving carcasses at other creatures are provided below.
Another four guards are located in here, and react with immediate hostility to the PCs' intrusion. I suggest the following encounter for a party of five adventurers:
Stat blocks:


Another four guards are located in here, and react with immediate hostility to the PCs' intrusion. I suggest the following encounter for a party of five adventurers:
- 1 Elf Archer
- 1 Elf Scout
- 2 Human Mercenaries
Stat blocks:


B1 (Shopfront)
As with the encounters in the old fishery, you should increase the size of All the World's Meat to allow for freer movement - a little less than double the original size is a good rule of thumb.
Should the PCs decide to employ the illicit services the mercenaries here offer, they can rid themselves of the few guards stationed up front - for a short while. Unless they devise a way to keep them away for longer, however, they return just as the PCs are about to leave All the World's Meat (likely with the unconscious or dead Verik in tow). I suggest the following encounter for a party of five adventurers:
Should the PCs decide to employ the illicit services the mercenaries here offer, they can rid themselves of the few guards stationed up front - for a short while. Unless they devise a way to keep them away for longer, however, they return just as the PCs are about to leave All the World's Meat (likely with the unconscious or dead Verik in tow). I suggest the following encounter for a party of five adventurers:
- 2 Mithrendain Guards (see Dragon Magazine Annual 2009)
- 2 Common Gladiators (see Dragon Magazine Annual 2009)
Welcome to the Guard
Give the party a major quest to deal with Vancaskerkin and his Cow Hammer Boys. Discovering the side business run by the mercenaries requires a Streetwise check (DC 10), with success by 5 or more indicating the the party learns the passphrase as well.
All the World's Meat is made up of five encounters - the entrance, the killing floor, the reefclaw pit, the boars, and the upper floor where Vancaskerkin makes his stand. While the boars and reefclaw certainly won't bother running to the aid of the Cow Hammer Boys, it's possible that the sounds of combat will carry through the building. Rather than rushing to help their fellow mercenaries, if violence is heard on the lower floor, the other thugs assume it's another angry "customer" upset at the thin (or absent) selection of fresh meat.
All the World's Meat is made up of five encounters - the entrance, the killing floor, the reefclaw pit, the boars, and the upper floor where Vancaskerkin makes his stand. While the boars and reefclaw certainly won't bother running to the aid of the Cow Hammer Boys, it's possible that the sounds of combat will carry through the building. Rather than rushing to help their fellow mercenaries, if violence is heard on the lower floor, the other thugs assume it's another angry "customer" upset at the thin (or absent) selection of fresh meat.
Long Live the Queen!
This part of the adventure will go by lightning-quick. It consists of a single visit to Castle Korvosa. The only conversion needed here is for the reward the party receives for returning the queen's brooch: 12 gold ingots worth 50 gold pieces each (treasure parcels 6, 7, and 8 from level 2).
A City Gone Mad
This portion of the adventure is relatively short, and its events are spread throughout the rest of Edge of Anarchy. While King Eodred's death occurs immediately, the unrest in Korvosa is long-lived. The encounters outlined in the City in Turmoil section should be interspersed throughout the rest of the adventure. There are five of them, and what follows is my suggestion for when the PCs ought to experience them.
Run the Meet the Mob encounter on the way back from the old fishery, immediately following the King's death.
Run the Mad Prophet encounter when the party makes its way to All the World's Meat.
Run the Drunken Guard encounter when the party returns from All the World's Meat, before they reach the Citadel.
Run the Imps and Dragons encounter when the party is summoned to the Citadel before being asked to investigate Eel's End.
Run the Otyugh Uprising encounter on the way back from Eel's End.
After Eel's End, the worst of the city's rioting problems have already taken place. Do make an effort to let the party play out all five encounters. They add some great local color to the game, and can help fill in some experience gaps to boot.
Sunday, November 8, 2009
A3 (Back Alley)
I've increased the number of sharks here to two, and created a new low-level shark stat block for use here and aboard the Eel's End. To compensate for the size of the sharks and the space needed for movement, increase both the size of the boardwalk and the distance between the fishery and the warehouse next door. I suggest the following encounter for a party of five adventurers:
Total: 500 xp (Level 1 Encounter)
Stat block:
Total: 500 xp (Level 1 Encounter)
Stat block:

The Brooch, the Harrowing Ritual, and the Harrow Deck
The value of the queen's brooch is largely unimportant. While it might be possible for the PCs to find someone willing to buy it (probably outside Korvosa), selling it would effectively end (or at least seriously derail) the campaign. Every effort should be made to encourage the PCs to return it to its owner, including giving the party a minor quest to ensure its safe return.
Harrowing
As the cards are laid out before your companions, the threads of fate spin unseen around you.
Level: 2
Category: Divination
Time: 10 minutes
Duration: Special
Component Cost: 30 gp, plus a focus worth 100 gp
Market Price: 100 gp
Key Skill: Arcana
As part of the casting of this ritual, perform a Harrow reading on a minor or major quest. Based on the results of the reading, the party will enjoy fate's blessing - or ill fortune - during certain encounters tied to that quest. At the end of the ritual, make an Arcana check. The check determines the number of upcoming encounters that this ritual affects, though the ritual's effects end if the quest is completed, even if the appropriate number of encounters have not taken place. Ultimately, the DM decides which encounters the party faces are tied to the quest and this ritual, and will inform you when you are participating in one of the affected encounters.

If the number of true aligned cards that appear in the spread is equal to or greater than the number of opposite aligned cards, the party gains a single Harrow point during each of these encounters that any one character can make use of.
If the number of true aligned cards that appear in the spread is less than the number of opposite aligned cards, the party loses the ability to spend Harrow points during these encounters.
If a character's choosing card appears in the spread, the first time that character is dropped to 0 or fewer hit points during the ritual's duration, fate intercedes and negates the triggering damage.
This ritual cannot be performed while the party is still under the ritual's effects.
Focus: A Harrow deck.
Zellara's Harrow Deck is a powerful artifact in its own right, and deserves to be treated as such mechanically. The DMG2 contains some helpful guidelines for artifacts designed for multiple players - practically all of the Harrow Deck's utility is located at the party-wide level. In addition, the Harrow Deck is not designed to depart the party at the end of a tier, like most artifacts are. It should be present with the party for the duration of the campaign (unless they manage to rid themselves of it, purposefully or inadvertently).


Pleased (16-20)

Satisfied (12-15)

Normal (5-11)
Unchanged from main stat block.

Angered (0 or lower)

Harrowing
As the cards are laid out before your companions, the threads of fate spin unseen around you.
Level: 2
Category: Divination
Time: 10 minutes
Duration: Special
Component Cost: 30 gp, plus a focus worth 100 gp
Market Price: 100 gp
Key Skill: Arcana
As part of the casting of this ritual, perform a Harrow reading on a minor or major quest. Based on the results of the reading, the party will enjoy fate's blessing - or ill fortune - during certain encounters tied to that quest. At the end of the ritual, make an Arcana check. The check determines the number of upcoming encounters that this ritual affects, though the ritual's effects end if the quest is completed, even if the appropriate number of encounters have not taken place. Ultimately, the DM decides which encounters the party faces are tied to the quest and this ritual, and will inform you when you are participating in one of the affected encounters.

If the number of true aligned cards that appear in the spread is equal to or greater than the number of opposite aligned cards, the party gains a single Harrow point during each of these encounters that any one character can make use of.
If the number of true aligned cards that appear in the spread is less than the number of opposite aligned cards, the party loses the ability to spend Harrow points during these encounters.
If a character's choosing card appears in the spread, the first time that character is dropped to 0 or fewer hit points during the ritual's duration, fate intercedes and negates the triggering damage.
This ritual cannot be performed while the party is still under the ritual's effects.
Focus: A Harrow deck.
Zellara's Harrow Deck is a powerful artifact in its own right, and deserves to be treated as such mechanically. The DMG2 contains some helpful guidelines for artifacts designed for multiple players - practically all of the Harrow Deck's utility is located at the party-wide level. In addition, the Harrow Deck is not designed to depart the party at the end of a tier, like most artifacts are. It should be present with the party for the duration of the campaign (unless they manage to rid themselves of it, purposefully or inadvertently).


Pleased (16-20)

Satisfied (12-15)

Normal (5-11)
Unchanged from main stat block.
Unsatisfied (1-4)

Angered (0 or lower)

Saturday, November 7, 2009
A12 - A14 (Gaedren's Playground)
The original adventure describes a scene that takes place every so often at the fishery. When it comes time to feed Gobblegut, he dangles a misbehaving orphan from the manacles there and slowly lowers it towards the alligator while tormenting the child with impossible questions. Giggles assists him with this. There is no better scene for the PCs to walk in on than this exact ritual taking place. It gives Giggles a reason to be present (beefing up the encounter a bit), reinforces that Gaedren is a horrible person who engages in mental torture and feeds children to alligators, and provides something unquestionably heroic for the PCs to do during the fight: save the kid from Gobblegut.
This room should also be enlarged, providing a couple of squares' width to walk around the opening in the floor.
Gaedren is only a standard monster. While he is the primary villain of this part of the adventure, he isn't much by himself. He relies on his thugs and urchins to do much of his dirty work for him, and age hasn't been terribly kind to the cretin. I suggest the following encounter for a party of five adventurers:
On Giggles' first action, he lets go of the rope as a free action, sending the child plummeting towards Gobblegut's snapping maw. At the end of Giggles' next turn, the child will hit the water. The PCs have that window of time to attempt a rescue, probably by using the terrain power provided below. If the PCs fail to rescue the child, it's up to you as a DM to decide the urchin's fate. If you'd like the kid to survive, have it ready an action to climb up one of the posts sticking up from below as soon as it touches the water, just barely out of reach of the alligator. If he is rescued, he does his best to scramble up atop the floor and into the room, where he tends to downed PCs with unmodified (+0) Heal checks.
Gaedren's footlocker contains the following adjusted treasure: a cigar case worth 15 gold pieces, a gold ingot worth 40 gold pieces, a crown worth 100 gold pieces, a kraken carving worth 75 gold pieces, a silver ring worth 50 gold pieces, an ivory figurine worth 120 gold pieces (altogether, treasure parcels 6, 8, 9 and 10 from level 1) as well as treasure parcels 2 and 4 from level 1.
Stat blocks:


This room should also be enlarged, providing a couple of squares' width to walk around the opening in the floor.
Gaedren is only a standard monster. While he is the primary villain of this part of the adventure, he isn't much by himself. He relies on his thugs and urchins to do much of his dirty work for him, and age hasn't been terribly kind to the cretin. I suggest the following encounter for a party of five adventurers:
- Gobblegut, Visejaw Crocodile
- Giggles, Half-Orc Archer (see Eberron Campaign Setting)
- Gaedren Lamm
On Giggles' first action, he lets go of the rope as a free action, sending the child plummeting towards Gobblegut's snapping maw. At the end of Giggles' next turn, the child will hit the water. The PCs have that window of time to attempt a rescue, probably by using the terrain power provided below. If the PCs fail to rescue the child, it's up to you as a DM to decide the urchin's fate. If you'd like the kid to survive, have it ready an action to climb up one of the posts sticking up from below as soon as it touches the water, just barely out of reach of the alligator. If he is rescued, he does his best to scramble up atop the floor and into the room, where he tends to downed PCs with unmodified (+0) Heal checks.
Gaedren's footlocker contains the following adjusted treasure: a cigar case worth 15 gold pieces, a gold ingot worth 40 gold pieces, a crown worth 100 gold pieces, a kraken carving worth 75 gold pieces, a silver ring worth 50 gold pieces, an ivory figurine worth 120 gold pieces (altogether, treasure parcels 6, 8, 9 and 10 from level 1) as well as treasure parcels 2 and 4 from level 1.
Stat blocks:


A9 & A10 (Kraken's Folly)
I've removed the spiders from this encounter - there are plenty of spiders in Part Four of this adventure, and they serve little thematic purpose here, so there's no real harm in the change. Instead, the hold is occupied by a few stirges and a pair of centipede swarms. You can leave the webbing in the hold as part of the description if you'd like (after all, the ship's been unused for a long time). I suggest the following encounter for a party of five adventurers:
- 3 Stirges
- 2 Centipede Swarms
A4 - A8 (The Old Fishery Upper Floor)
All of the encounters on the upper floor have been combined, here. Given the tight quarters of the original adventure, it was likely that starting a fight in one room would bring the others running anyway.
Increase the size of the fishery substantially. Avoid one-square-wide hallways or walkways, and make sure that there is enough room for both PCs and monsters to move about.
Place the dog in the entry room, and have the rest of the monsters file in during the first and second rounds of combat. I suggest the following encounter for a party of five adventurers:
Giggles has been relocated to the lower floor, for reasons that will be explained in that encounter's write-up.
The PCs can influence the children's behavior through a skill challenge, provided below.
Stat block:

Increase the size of the fishery substantially. Avoid one-square-wide hallways or walkways, and make sure that there is enough room for both PCs and monsters to move about.
Place the dog in the entry room, and have the rest of the monsters file in during the first and second rounds of combat. I suggest the following encounter for a party of five adventurers:
- The Children, 8 Human Gang Members (see Forgotten Realms Campaign Guide)
- Bloo, Starved Dog (see Forgotten Realms Campaign Guide)
- Hookshanks, Gnome Skulk
- Lamm's Little Lambs
- Yargin, Human Bandit
Giggles has been relocated to the lower floor, for reasons that will be explained in that encounter's write-up.
The PCs can influence the children's behavior through a skill challenge, provided below.
Stat block:

Subscribe to:
Posts (Atom)